Windows Server 2k8 2k12 2k16 failing to boot.
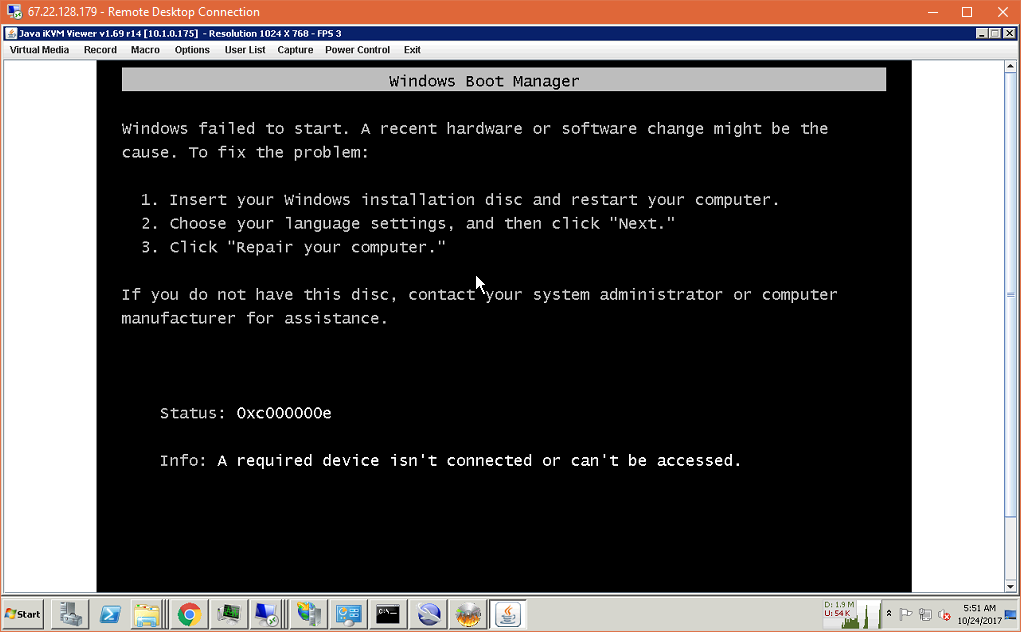
Failing to boot showing the following error:
OR
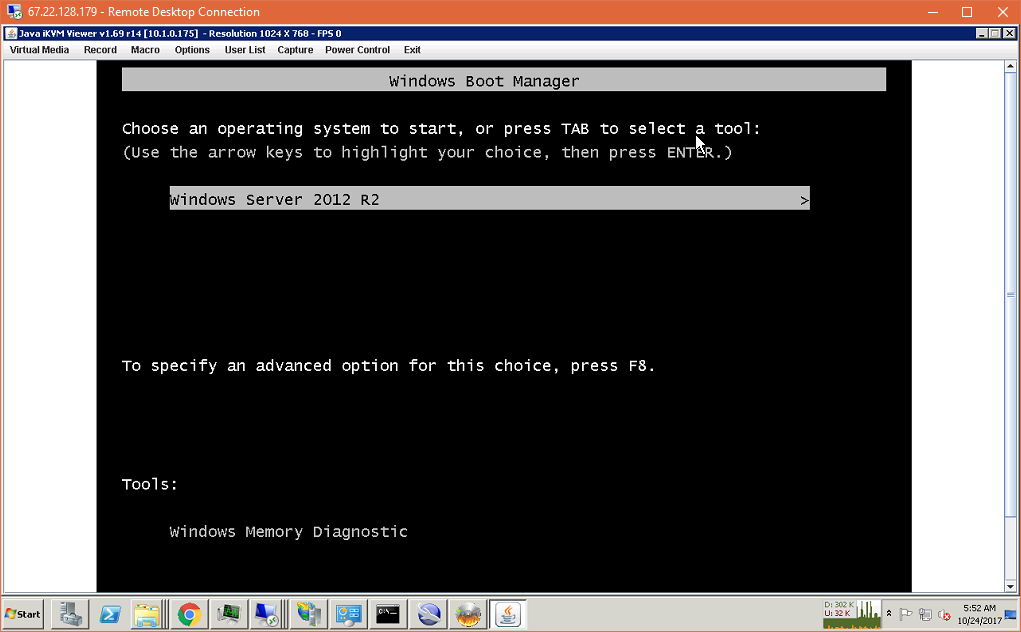
You cant see the SAFE MODE and other options are not available to you when you press F8 as shown from :
P.S. also check Microsoft documentation from:
https://support.microsoft.com/en-us/help/927392/use-bootrec-exe-in-the-windows-re-to-troubleshoot-startup-issues
========
If the Boot Configuration Data (BCD) store is missing, becomes corrupted, or isn't properly configured, Windows won't be able to start and you'll see BOOTMGR is Missing or a similar error messages pretty early on in the boot process.
The easiest solution to a BCD issue is to simply rebuild it, which you can do automatically with the bootrec command, fully explained below.
Note: If you've already scrolled down through this tutorial and it looks like too much, don't worry.
Yes, there are several commands to run and lots of output on the screen, but rebuilding the BCD is a very straightforward process. Just follow the instructions exactly and you'll be fine.
Important: The following instructions apply to Windows 10, Windows 8, Windows 7, and Windows Vista. Similar problems can exist in Windows XP but since boot configuration information is stored in the boot.ini file, and not the BCD, correcting issues with boot data involves a completely different process. See How to Repair or Replace Boot.ini in Windows XP for more information.
Rebuilding the BCD in Windows should only take around 15 minutes and, while it isn't the easiest thing you'll ever do, it isn't too tough either, especially if you stick to the directions below.
Start Advanced Startup Options if you're using Windows 10 or Windows 8 or Windows Server 2008 or Windows Server 2012 or Windows Servers 2016.
Start System Recovery Options if you're using Windows 7 or Windows Vista. See the How to Access the System Recovery Options Menu section in that link I just gave you for help if this is your first time using the menu.
Open Command Prompt from Advanced Startup Options or System Recovery Options menu.
Note: The Command Prompt available from these diagnostic menus is very similar to the one you may be familiar with within Windows. Also, the following procedure should work identically in Windows 10, 8, 7, and Vista.
At the prompt, type the bootrec command as shown below and then press Enter:
bootrec /rebuildbcd
The bootrec command will search for Windows installations not included in the Boot Configuration Data and then ask you if you'd like to add one or more to it.
You should see one of the following messages at the command line.
Option 1
Scanning all disks for Windows installations.
Please wait, since this may take a while...
Successfully scanned Windows installations.
Total identified Windows installations: 0
The operation completed successfully.
Option 2
Scanning all disks for Windows installations.
Please wait, since this may take a while...
Successfully scanned Windows installations.
Total identified Windows installations: 1
[1] D:\Windows
Add installation to boot list? Yes/No/All:
If you see:
Option 1: Move on to Step 5. This result most likely means that Windows installation data in the BCD store exists but bootrec couldn't find any additional installations of Windows on your computer to add to the BCD. That's fine, you'll just need to take a few extra steps to rebuild the BCD.
Option 2: Enter Y or Yes to the Add installation to boot list? question, after which you should see a The operation completed successfully message, followed by a blinking cursor at the prompt. Finish up with Step 10 toward the bottom of the page.
Since the BCD store exists and lists a Windows installation, you'll first have to "remove" it manually and then try to rebuild it again.
At the prompt, execute the bcdedit command as shown and then press Enter:
bcdedit /export c:\bcdbackup
The bcdedit command is used here to export the BCD store as a file: bcdbackup. There's no need to specify a file extension.
The command should return the following on screen, meaning the BCD export worked as expected:
The operation completed successfully.
At this point, you need to adjust several file attributes for the BCD store so you can manipulate it.
At the prompt, execute the attrib command exactly like this:
attrib c:\boot\bcd -h -r -s
What you just did with the attrib command was remove the hidden, read-only, and system attributes from the file bcd. Those attributes restricted the actions you could take on the file. Now that they're gone, you can manipulate the file more freely - specifically, rename it.
To rename the BCD store, execute the ren command as shown:
ren c:\boot\bcd bcd.old
Now that the BCD store is renamed, you should now be able to successfully rebuild it, as you tried to do in Step 3.
Note: You could delete the BCD file entirely since you're about to create a new one. However, renaming the existing BCD accomplishes the same thing since it's now unavailable to Windows, plus provides you yet another layer of backup, in addition to the export you did in Step 5, if you decide to undo your actions.
Try rebuilding the BCD again by executing the following, followed by Enter:
bootrec /rebuildbcd
which should produce this in the Command Prompt window:
Scanning all disks for Windows installations.
Please wait, since this may take a while...
Successfully scanned Windows installations.
Total identified Windows installations: 1
[1] D:\Windows
Add installation to boot list? Yes/No/All:
meaning that the BCD store rebuild is progressing as expected.
At the Add installation to boot list? question, type Y or Yes, followed by the Enter key.
You should see this on screen:
The operation completed successfully.
meaning that the BCD rebuild is complete.
Restart your computer.
Assuming that an issue with the BCD store was the only problem, Windows should start as expected.
If not, continue to troubleshoot whatever specific issue you're seeing that's preventing Windows from booting normally.
Important: Depending on how you started Advanced Startup Options or System Recovery Options, you may need to remove a disc or flash drive or iso before restarting.
OR
You cant see the SAFE MODE and other options are not available to you when you press F8 as shown from :
P.S. also check Microsoft documentation from:
https://support.microsoft.com/en-us/help/927392/use-bootrec-exe-in-the-windows-re-to-troubleshoot-startup-issues
========
If the Boot Configuration Data (BCD) store is missing, becomes corrupted, or isn't properly configured, Windows won't be able to start and you'll see BOOTMGR is Missing or a similar error messages pretty early on in the boot process.
The easiest solution to a BCD issue is to simply rebuild it, which you can do automatically with the bootrec command, fully explained below.
Note: If you've already scrolled down through this tutorial and it looks like too much, don't worry.
Yes, there are several commands to run and lots of output on the screen, but rebuilding the BCD is a very straightforward process. Just follow the instructions exactly and you'll be fine.
Important: The following instructions apply to Windows 10, Windows 8, Windows 7, and Windows Vista. Similar problems can exist in Windows XP but since boot configuration information is stored in the boot.ini file, and not the BCD, correcting issues with boot data involves a completely different process. See How to Repair or Replace Boot.ini in Windows XP for more information.
Rebuilding the BCD in Windows should only take around 15 minutes and, while it isn't the easiest thing you'll ever do, it isn't too tough either, especially if you stick to the directions below.
Start Advanced Startup Options if you're using Windows 10 or Windows 8 or Windows Server 2008 or Windows Server 2012 or Windows Servers 2016.
Start System Recovery Options if you're using Windows 7 or Windows Vista. See the How to Access the System Recovery Options Menu section in that link I just gave you for help if this is your first time using the menu.
Open Command Prompt from Advanced Startup Options or System Recovery Options menu.
Note: The Command Prompt available from these diagnostic menus is very similar to the one you may be familiar with within Windows. Also, the following procedure should work identically in Windows 10, 8, 7, and Vista.
At the prompt, type the bootrec command as shown below and then press Enter:
bootrec /rebuildbcd
The bootrec command will search for Windows installations not included in the Boot Configuration Data and then ask you if you'd like to add one or more to it.
You should see one of the following messages at the command line.
Option 1
Scanning all disks for Windows installations.
Please wait, since this may take a while...
Successfully scanned Windows installations.
Total identified Windows installations: 0
The operation completed successfully.
Option 2
Scanning all disks for Windows installations.
Please wait, since this may take a while...
Successfully scanned Windows installations.
Total identified Windows installations: 1
[1] D:\Windows
Add installation to boot list? Yes/No/All:
If you see:
Option 1: Move on to Step 5. This result most likely means that Windows installation data in the BCD store exists but bootrec couldn't find any additional installations of Windows on your computer to add to the BCD. That's fine, you'll just need to take a few extra steps to rebuild the BCD.
Option 2: Enter Y or Yes to the Add installation to boot list? question, after which you should see a The operation completed successfully message, followed by a blinking cursor at the prompt. Finish up with Step 10 toward the bottom of the page.
Since the BCD store exists and lists a Windows installation, you'll first have to "remove" it manually and then try to rebuild it again.
At the prompt, execute the bcdedit command as shown and then press Enter:
bcdedit /export c:\bcdbackup
The bcdedit command is used here to export the BCD store as a file: bcdbackup. There's no need to specify a file extension.
The command should return the following on screen, meaning the BCD export worked as expected:
The operation completed successfully.
At this point, you need to adjust several file attributes for the BCD store so you can manipulate it.
At the prompt, execute the attrib command exactly like this:
attrib c:\boot\bcd -h -r -s
What you just did with the attrib command was remove the hidden, read-only, and system attributes from the file bcd. Those attributes restricted the actions you could take on the file. Now that they're gone, you can manipulate the file more freely - specifically, rename it.
To rename the BCD store, execute the ren command as shown:
ren c:\boot\bcd bcd.old
Now that the BCD store is renamed, you should now be able to successfully rebuild it, as you tried to do in Step 3.
Note: You could delete the BCD file entirely since you're about to create a new one. However, renaming the existing BCD accomplishes the same thing since it's now unavailable to Windows, plus provides you yet another layer of backup, in addition to the export you did in Step 5, if you decide to undo your actions.
Try rebuilding the BCD again by executing the following, followed by Enter:
bootrec /rebuildbcd
which should produce this in the Command Prompt window:
Scanning all disks for Windows installations.
Please wait, since this may take a while...
Successfully scanned Windows installations.
Total identified Windows installations: 1
[1] D:\Windows
Add installation to boot list? Yes/No/All:
meaning that the BCD store rebuild is progressing as expected.
At the Add installation to boot list? question, type Y or Yes, followed by the Enter key.
You should see this on screen:
The operation completed successfully.
meaning that the BCD rebuild is complete.
Restart your computer.
Assuming that an issue with the BCD store was the only problem, Windows should start as expected.
If not, continue to troubleshoot whatever specific issue you're seeing that's preventing Windows from booting normally.
Important: Depending on how you started Advanced Startup Options or System Recovery Options, you may need to remove a disc or flash drive or iso before restarting.
Related Articles
Setup Active Directory ADDS on Windows Server 2012
In order to make the windows server 2012 domain controller we will install ADDS (Active Directory Domain Services) role from the server manager on Windows Server 2012. All the Latest security updates must applied before installing the Role. First we ...Setting up Remote Apps on Windows and Mac and IOs Devices
Users have 2 options to fetch RDS Apps. Log in directly to RDWeb CAD - https://rds-cad.dnpexchange.com USA - https://rds-usa.dnpexchange.com Users can log in utilizing their RDS users created in SolidCP (email address + password) and will grant ...Bare Metal Restore for Windows
Bare Metal Restore for Windows Step 1 Select rescue point, same way as for REAR: Next step download ISO image. Own image for every particular server but same for all rescue dates. You'll see problem to setup network. It's all you need to do there. ...Windows: Accessing Your Server with Remote Desktop
This article explains how to use Remote Desktop to access your Windows server’s desktop from anywhere in the world. Please note that this article pertains only to customers who have a Windows server hosted with Cartika. On a normal Windows computer ...Samba Share on windows
To Share a Samba Directory on Network with Windows (network mapped drive) -- Make sure Samba is installed on the linux box first. a. Add the unix accounts on the server To add the unix accounts, use the following commands: useradd $USER passwd $USER ...