Linux BMR (ReaR)
Cartika has developed a new Linux BMR tool into our backups/dr and BaaS offerings. This is more tightly integrated with our GUI and is based on the ReaR *nix server imaging technology.
This new Linux BMR replaces the legacy/original Linux BMR. AS ANNOUNCED, PLEASE ENSURE YOU ENTER THE JOB WIZARD FOR ALL YOUR LINUX SERVERS AND UNSELECT THE LEGACY LINUX BMR AND ENABLE THE NEW LINUX BMR(REAR) FOR EACH SERVER IN YOUR BACKUPS/DR AND BAAS ACCOUNTS
1) select the new Linux BMR (ReaR)
2) save the wizard, ensuring you enter your SSH credentials (if you do not have an SSH key stored) so as to update the server side scripts and install/configure ReaR based BMR on your *nix server/VM
Thats it, you're ready to use ReaR Linux BMR whenever you need to BMR your Linux server in the future
ReaR Supported OS versions
RHEL/CentOS/Couldlinux 5.x > v7.x
Debian v7.x
Ubuntu 12.x and 14.x
If your *nix version does not support automatic ReaR installation and configuration, there is a manual install option
http://relax-and-recover.org/documentation/installation
Typically, you just need to install it on your OS, no configuration is required, and our system will handle that once installed and you complete the wizard process, entering in your SSH credentials (again, only required if you have NOT enabled SSH key access)
Initiate a BMR
On server list simply click rear icon (looks like a disk) to start BMR Process:

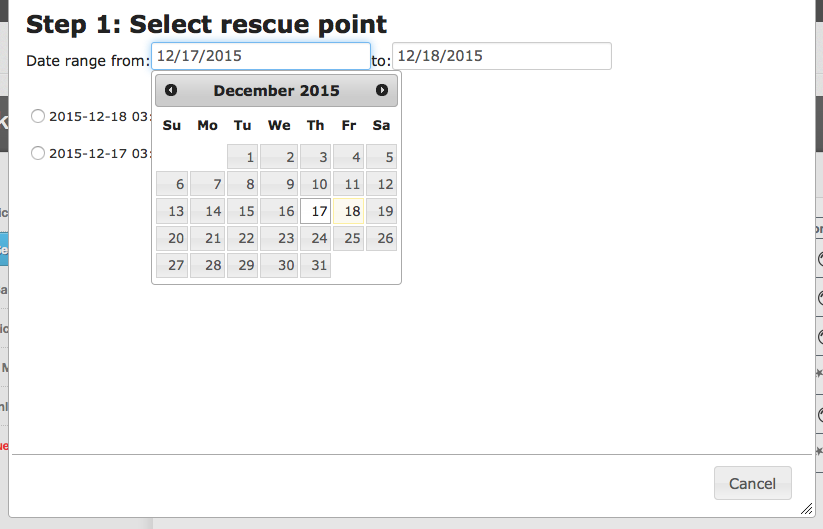
Browse and select rescue desired dates and restore point
Download rescue image and boot server in rescue mode
System checks access to storage device where the data from the selected restore point was stored. If ssh key is installed, it proceeds, If no SSH key was installed, it requests ssh credentials. Download link for rescue image is then provided:

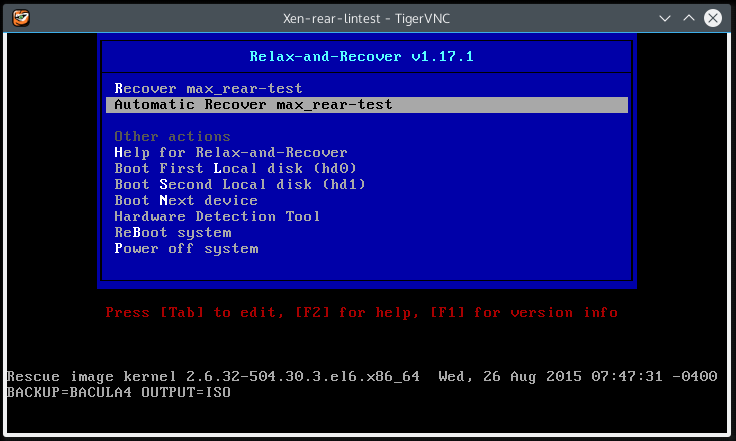
Burn the recovery image to CD/DVD or USB stick and boot server from it. Please note: by default servers will try to boot from hdd - in which case, manually select "Automatic recovery":
Please Note - Cartika IaaS customers, please see HERE for uploading and booting a VM from an ISO such as this
Important !!! The system will automatically reformat your disk and destroy all data (if there was any data present) in accordance with disk layout as it existed in the restore point you are restoring from.
Please wait for until you are prompted to return to the Bacula4 (Cartika BaaS) GUI:

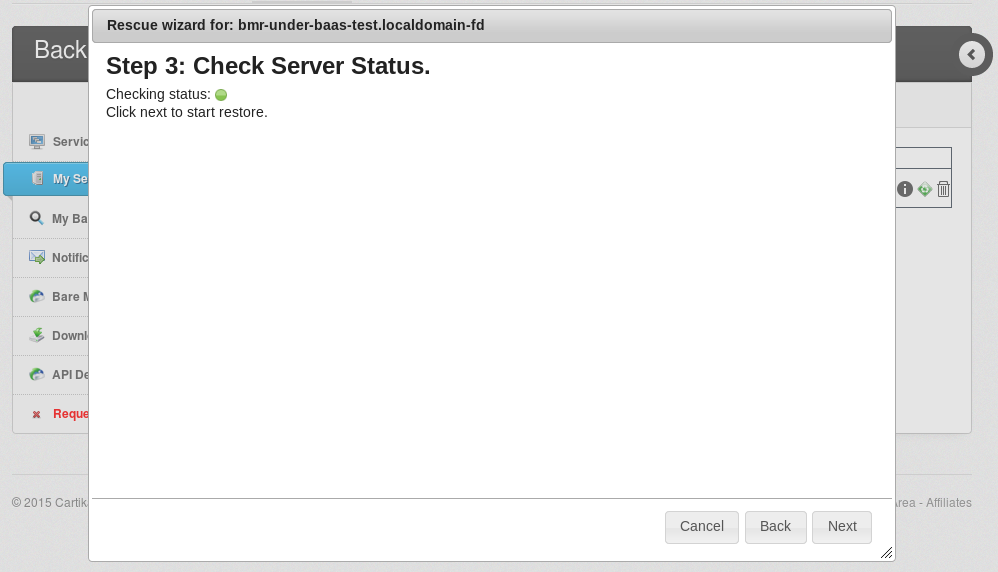
System checks connectivity and access to server and makes sure that it successfully booted from recovery media. Once you see green status, click next:
Restore data
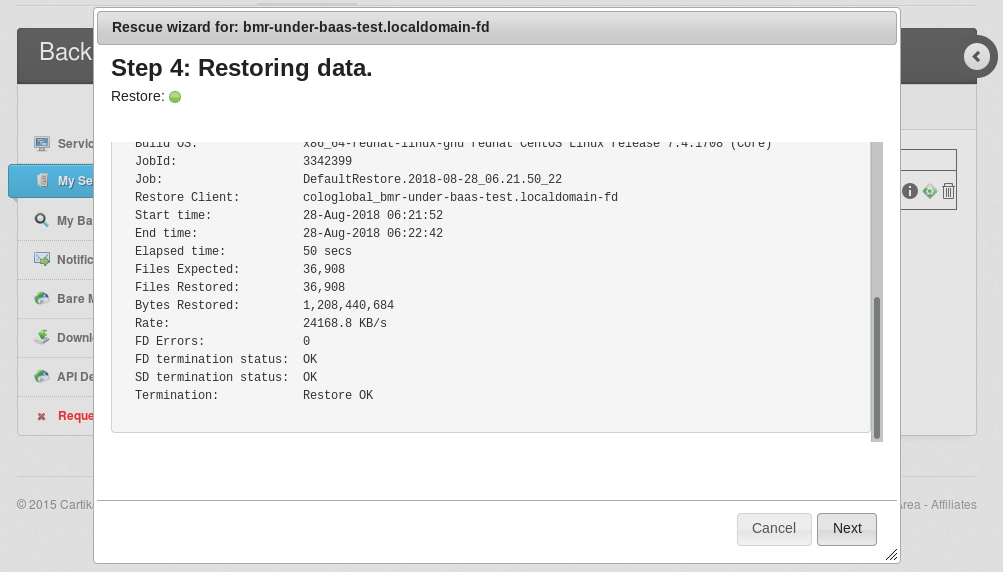
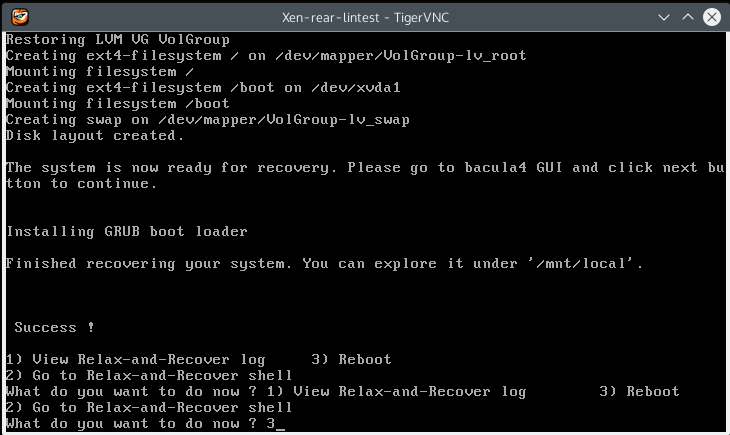
The system restores your servers files and data and displays the Bacula restore log. File size errors are safe to ignore and are automatically compensated for. When restore completes, you will be prompted to "finish":
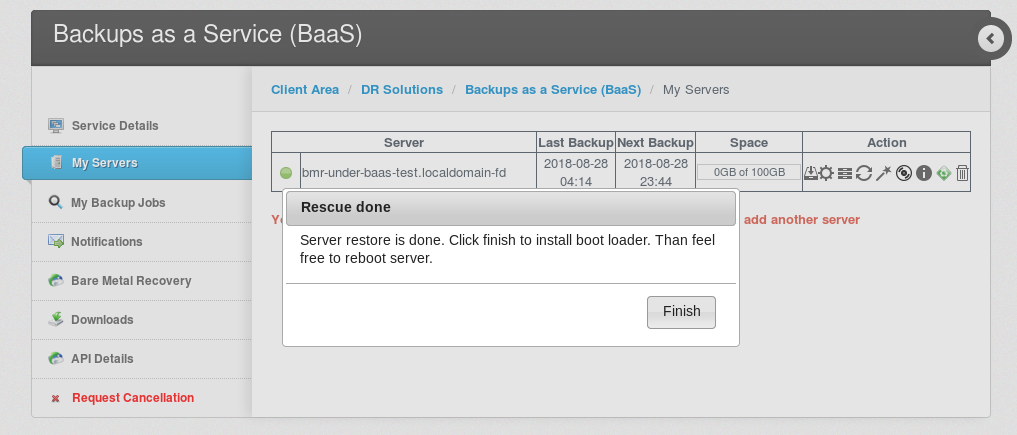
Within 15-30 seconds, boot loader is installed and server console prompts you to reboot server or check logs. Simply type "3" and press enter to boot the server.
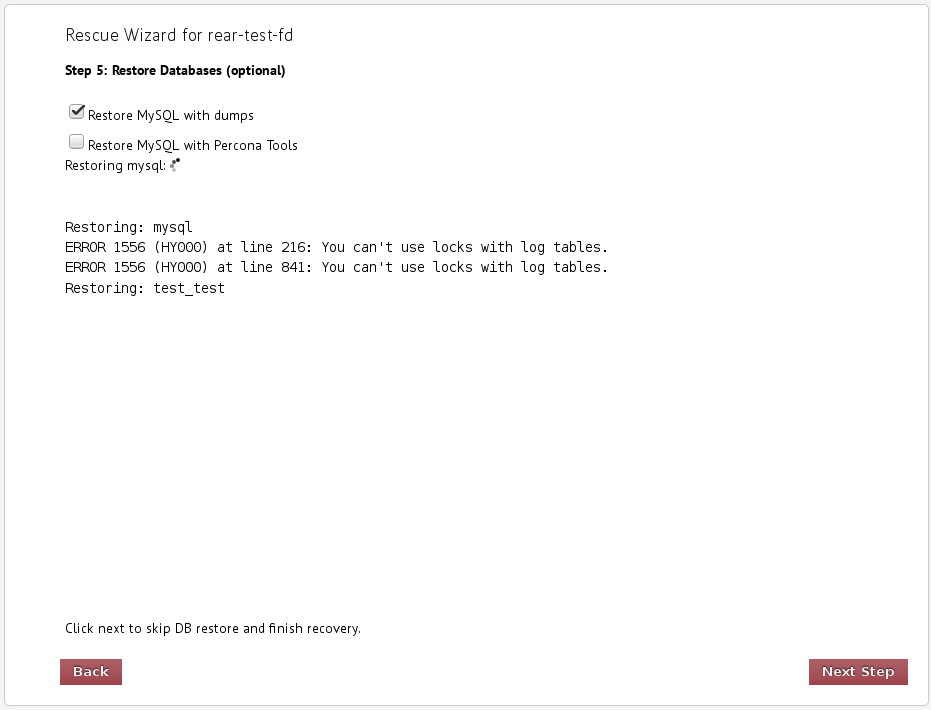
Restore MySQL
If MySQL Backups are enabled on the server (MySQL Dump or Percona MySQL backups) you'll be prompted to restore MySQL. This step is optional and may not be required if you did not receive any errors in mysql data folder, its likely safe to skip this step (but can still be completed to absolutely ensure mysql data integrity)
Example of MySQL Recovery from MySQL Dump Backup Method:
Example of MySQL Recovery from Percona MySQL Tools Backup Method:
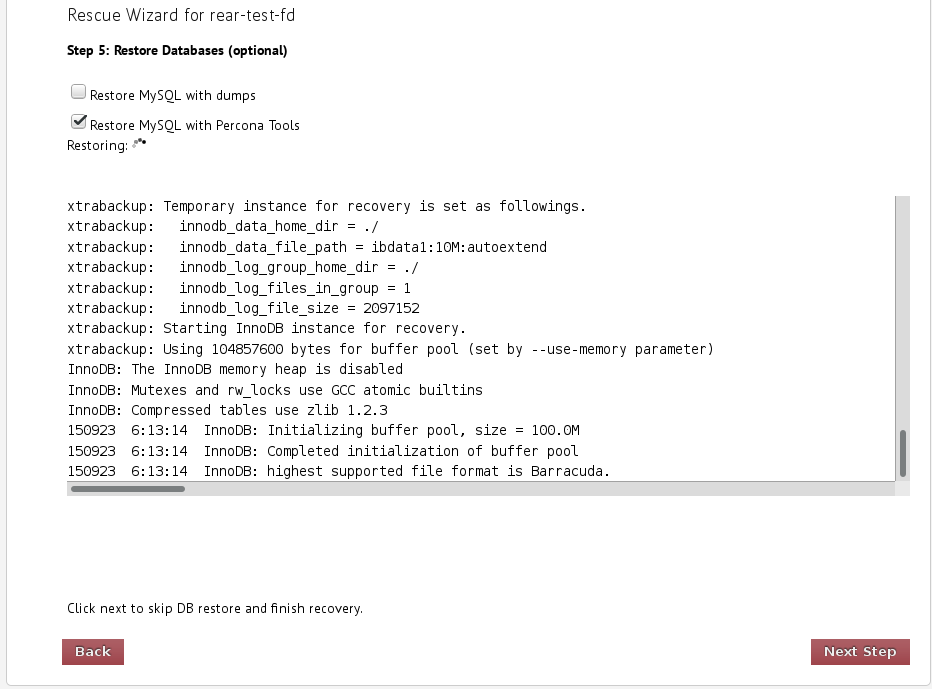
PLEASE NOTE: Percona recovery only works with the default mysql data folder location as defined in /var/lib/mysql for other desired scenarios, you will need to restore mysql manually via regular recovery procedures.
This new Linux BMR replaces the legacy/original Linux BMR. AS ANNOUNCED, PLEASE ENSURE YOU ENTER THE JOB WIZARD FOR ALL YOUR LINUX SERVERS AND UNSELECT THE LEGACY LINUX BMR AND ENABLE THE NEW LINUX BMR(REAR) FOR EACH SERVER IN YOUR BACKUPS/DR AND BAAS ACCOUNTS
1) select the new Linux BMR (ReaR)
2) save the wizard, ensuring you enter your SSH credentials (if you do not have an SSH key stored) so as to update the server side scripts and install/configure ReaR based BMR on your *nix server/VM
Thats it, you're ready to use ReaR Linux BMR whenever you need to BMR your Linux server in the future
ReaR Supported OS versions
RHEL/CentOS/Couldlinux 5.x > v7.x
Debian v7.x
Ubuntu 12.x and 14.x
If your *nix version does not support automatic ReaR installation and configuration, there is a manual install option
http://relax-and-recover.org/documentation/installation
Typically, you just need to install it on your OS, no configuration is required, and our system will handle that once installed and you complete the wizard process, entering in your SSH credentials (again, only required if you have NOT enabled SSH key access)
Initiate a BMR
On server list simply click rear icon (looks like a disk) to start BMR Process:
Browse and select rescue desired dates and restore point
Download rescue image and boot server in rescue mode
System checks access to storage device where the data from the selected restore point was stored. If ssh key is installed, it proceeds, If no SSH key was installed, it requests ssh credentials. Download link for rescue image is then provided:
Burn the recovery image to CD/DVD or USB stick and boot server from it. Please note: by default servers will try to boot from hdd - in which case, manually select "Automatic recovery":
Please Note - Cartika IaaS customers, please see HERE for uploading and booting a VM from an ISO such as this
Important !!! The system will automatically reformat your disk and destroy all data (if there was any data present) in accordance with disk layout as it existed in the restore point you are restoring from.
Please wait for until you are prompted to return to the Bacula4 (Cartika BaaS) GUI:
System checks connectivity and access to server and makes sure that it successfully booted from recovery media. Once you see green status, click next:
Restore data
The system restores your servers files and data and displays the Bacula restore log. File size errors are safe to ignore and are automatically compensated for. When restore completes, you will be prompted to "finish":
Within 15-30 seconds, boot loader is installed and server console prompts you to reboot server or check logs. Simply type "3" and press enter to boot the server.
Restore MySQL
If MySQL Backups are enabled on the server (MySQL Dump or Percona MySQL backups) you'll be prompted to restore MySQL. This step is optional and may not be required if you did not receive any errors in mysql data folder, its likely safe to skip this step (but can still be completed to absolutely ensure mysql data integrity)
Example of MySQL Recovery from MySQL Dump Backup Method:
Example of MySQL Recovery from Percona MySQL Tools Backup Method:
PLEASE NOTE: Percona recovery only works with the default mysql data folder location as defined in /var/lib/mysql for other desired scenarios, you will need to restore mysql manually via regular recovery procedures.
Related Articles
New Access Management User setup on Linux
1) Login to your accounts.cartika.com account 2) Select your access management service (customers with managed infrastructure in both the US and CAD will have two) 3) Navigate to Login to SolidCP -> Click Login 4) Click on Users under your Hosted ...Linux
Linux System Information: Print Kernel and OS Release Versions: uname -r (or uname -a for all info) 2.6.32-531.29.2.lve1.3.11.1.el6.x86_64 cat /etc/*release* CloudLinux Server release 6.6 (Leonid Kizim) Linux Watch Limit: ...Managing Repos in Linux
Removing / Disabling Package/Repos causing conflicts During Yum Update During yum update if there is a conflict, you need to fix by excluding unwanted 3rd party packages / repos that belongs to a specific repository, use any one of the two methods ...How to install Composer in Linux
To install Composer onto a Linux server run the following commands to, in order. Download the installer to the current directory Verify the installer Run the installer Remove the installer 1)php -r "copy('https://getcomposer.org/installer', ...Clear Cached Memory On Linux Without Reboot
If a Linux server appears to have inodes or dentries filling up cached memory, here is how you can flush it without putting the server through a reboot. This will only work with linux kernels equal to or greater then version 2.6.16+ which was ...